Human beings are bound by life, and locks are no exception. It is impossible to terminate the life of the day. Therefore, we need to replace a new lock in time, but the size of each lock is different. The size of the keyhole we need to install is also different, so we need to know the size of our original lock.
Lock classification
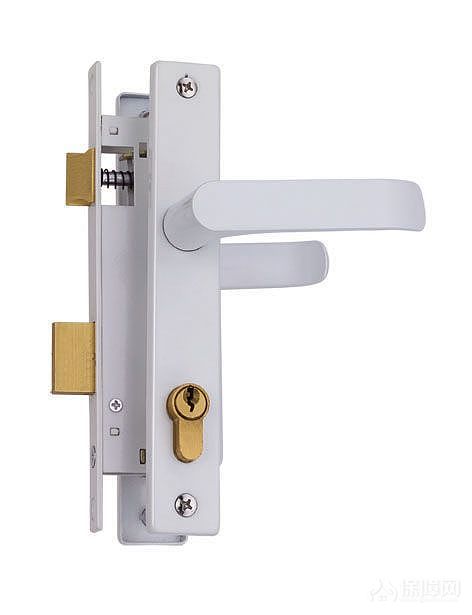
Door lock
The safety lock tongue can be opened by the inner and outer handles. When the outer handle is locked by the locking device inside, use the key on the outer handle or turn the locking device on the inner handle to release it; when in the permanent insurance state, the outer handle must be opened with the key; Closing the door does not release the button or other locking device.
Bathroom lock
The lock tongue can be opened by the inner and outer handles. The outer handle can be locked by an internal button or other locking device and can be released by an external emergency device. When the internal handle is rotated or the handle is in the unlocked state before this, the locking device should be automatically released, and the external release device should be allowed to open outside.
Toilet lock
The lock tongue can be opened by the inner and outer handles. When the outer handle is locked by the inner knob, the external handle should have an obvious display, and the external emergency device and knob must be manually rotated to release the outer handle.
Channel lock
The lock tongue can be opened at any time by the internal and external handles.
Closet lock
The safety bolt can be opened by the key on the outer hand.
Balcony or patio lock
The safety lock tongue can be opened by the inner and outer handles. The outer handle can be locked by an internal button or other locking device, and the inner handle or the closed door can be released.
Fixed lock
The square tongue (or cylindrical tongue) can be opened at any time by the inner and outer keys or the inner knob.
Pull glove lock
It is made up of a fixed lock and a handle ball lock; the handle ball lock tongue can be opened at any time by the outer button or the inner handle.
Many times, our door locks are built in, we have no basis to judge its size, so many friends will choose to remove the lock, and then take this bad lock to the market to buy, but dear Friends, do you know how to remove the lock?
Door lock removal step one
The door lock disassembly has never been experienced by many friends, but everyone does not have to worry about it. The experience is accumulated. What we need to do is patient study. Therefore, the first thing we have to do is to stay close to The disc on the door is loosened with a screwdriver or other relatively hard tool and then twisted in the opposite direction of unlocking until it retreats to the back.
Door lock removal step two
Next, we need to twist the door handle in the direction of over-locking. After we see the small hole above, we are looking for a small thing to insert into the hole, so that it can play a fixed role, so that we can Quickly pull out the part of the handle, which will complete the most important step in our unlocking process. We will be much easier when doing the following operations.
Door lock removal step three
After the handle is removed, we can easily shake the disc that has just been loosened by us, then use a screwdriver to remove the screw, then we will pull it out and let it out. We have completed the disassembly process of the door lock. Is it very simple? Do you know if you have learned it?
Handle anti-theft door lock removal method:
1. Unscrew the screws of the fixed lock cylinder on the panel and remove the lock cylinder.
2, then unscrew the remaining 2 screws on the panel, 2 panels can be taken down
3. The screws on the side locks of the door are also unscrewed and removed.
Ball lock removal method:
1. Loosen the disc that clings to the door inside, then twist it counterclockwise to let it fall back.
2, then turn the part of the hand (that is, the ball) to the left and right, carefully look at the above there is a small hole, use a thin thing to insert and force to withstand, the ball can be pulled out.
3. Take out the disc that has just been lifted out. You will see two screws, drop them, and pull them out from the side of the door.
How to install the handle lock
One: Determine the direction of opening the door. The general door has 4 opening directions, which are left outer, left inner, right inner and right outer. Confirm the direction of the door before installation to avoid reverse conditions.
Second: adjust the front and back position of the oblique tongue according to the direction of opening the door.
Some products have the function of left and right reversal. The course changes the direction of the oblique tongue according to the following steps, and then the inner and outer wrench sets are reversed, and the direction can be reversed.
1. Turn the lock body upside down to allow the slanting tongue positioning piece to leave.
2, easily push the oblique tongue to the space position, choose to turn 180 degrees to loosen, restore or change direction.
Three: special device handle change
In the center of the door thickness, make a width, depth and depth according to the size of the lock body hole. Dig a panel hole according to the height dimension of the panel (3MM), and ask the panel to be flush with the door. The position of each hole shall be dimensioned according to the figure, and shall not be changed at will, and shall not be skewed.
to sum up
After the above introduction, I believe that everyone must feel that the removal of the door lock is very simple. I also believe that everyone has already learned it. If you need it later, you must follow this step. After the lock is removed, we can take it to buy our favorite door lock. It can be installed according to the above instructions, and it is very simple.
Editor in charge: Xu Yuehua
Nails are essential tools in construction and woodworking. They are typically made of steel and are used to fasten pieces of wood, concrete, or other materials together.
1. Masonry Steel Nail: These nails are designed specifically for use in masonry and concrete. They are typically made of hardened steel, which allows them to penetrate hard surfaces without bending or breaking. Masonry steel nails are often used in construction projects involving brick, concrete, or stone.
2. Steel Nail For Concrete: As the name suggests, these nails are used specifically for fastening materials to concrete. They are made of strong, durable steel and are designed to withstand the pressure of being driven into concrete. These nails are often used in construction and renovation projects involving concrete slabs or walls.
3. Strong Concrete Nails: These are high-strength nails designed for use in concrete and other hard materials. They are often made of hardened steel or another durable material, and they are designed to resist bending, breaking, or otherwise failing when used in tough construction or renovation projects.
Nails,Masonry Steel Nail,Steel Nail For Concrete,Strong Concrete Nails
Hebei Aibuer trading co., Ltd , https://www.ablewiremesh.com