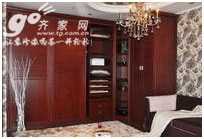
Overview:
The overall wardrobe production process is different from the general purchase of panel furniture. First, the designer will have a close contact with the user, understand the user's hobbies and their home style, and then go to the door to measure and design a reasonable overall wardrobe. During this period, the designer will provide computer renderings. After the user is satisfied, the overall wardrobe will be produced by the assembly line according to the drawings.
tool:
Electric tools: charge batch, impact drill, jig saw, polisher, angle grinder
Hand tools: hole cutter, level ruler, glass glue gun, tape measure, square ruler, hammer
Steps/methods:
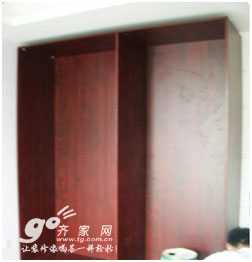
1. Use a cloth to make a good point on the floor. Start by assembling the wide side plate on one end against the wall. Place the wide side plate flat on the ground (a distance of 700 mm from the rear wall). First, place the filled three-in-one rubber plug plate flat on the cloth, check the hole spacing and the drawings, and install a three-in-one single link. Then the solid nails are fastened to the cork and fixed on the wide side plate. The big handle hole of the top plate faces upwards, and the rest of the solid layers are facing downwards. The big handle holes of the foot line are inwards (the middle solid layer is the same height as the L frame, ie, the bottom plate is solid to the solid layer. The inner space is 960mm, and the floor plate holes are used. Put the side plate and screw it with a cork. The cork needs to connect the solid layers on both sides. Install the double connecting rod on the second cabinet, note that the big handle on the double connecting rod can only be locked half, ie 90°. When the two solid layers are fixed with the side plates, tighten the big handle at the same time. Repeat the installation procedure for the second cabinet when installing the third cabinet.

2, nail back board. Lay the entire cabinet side on the well-being floor and flatten the side panels into the same plane. Use a ruler to measure the diagonal dimensions of the cabinet and adjust it to equal. Install the first back plate from the wide plate. Note that if there is a nail in the middle of the solid nail, first draw the centerline of the solid layer with a pencil, and then nail it. nail.
Woodworking Knowledge Wardrobe Brand Sophia Wardrobe Glass Home Door Effect Picture Furniture Drawer Cabinet Cabinet Cabinet Door Glass Cabinet Glass Furniture Panel Furniture Glass Door
Thermostatic faucets also called thermostatic taps or thermostatic valves. It`s having or maintaining a consistent temperature. You will not feel too cold or too hot when open the faucet (also spigot or tap: see usage variations) for washing and drying.
Thermostatic Faucet,Exposed Thermostatic Shower Faucet,Thermostatic Shower Set,Bathroom Thermostat Faucet
Kaiping Jenor Sanitary Ware Co., Ltd , https://www.sanitaryjenor.com